Pattern Viewer
View, navigate, and track progress on your cross-stitch patterns with multiple display modes.
Some features on this page require the Full Version.
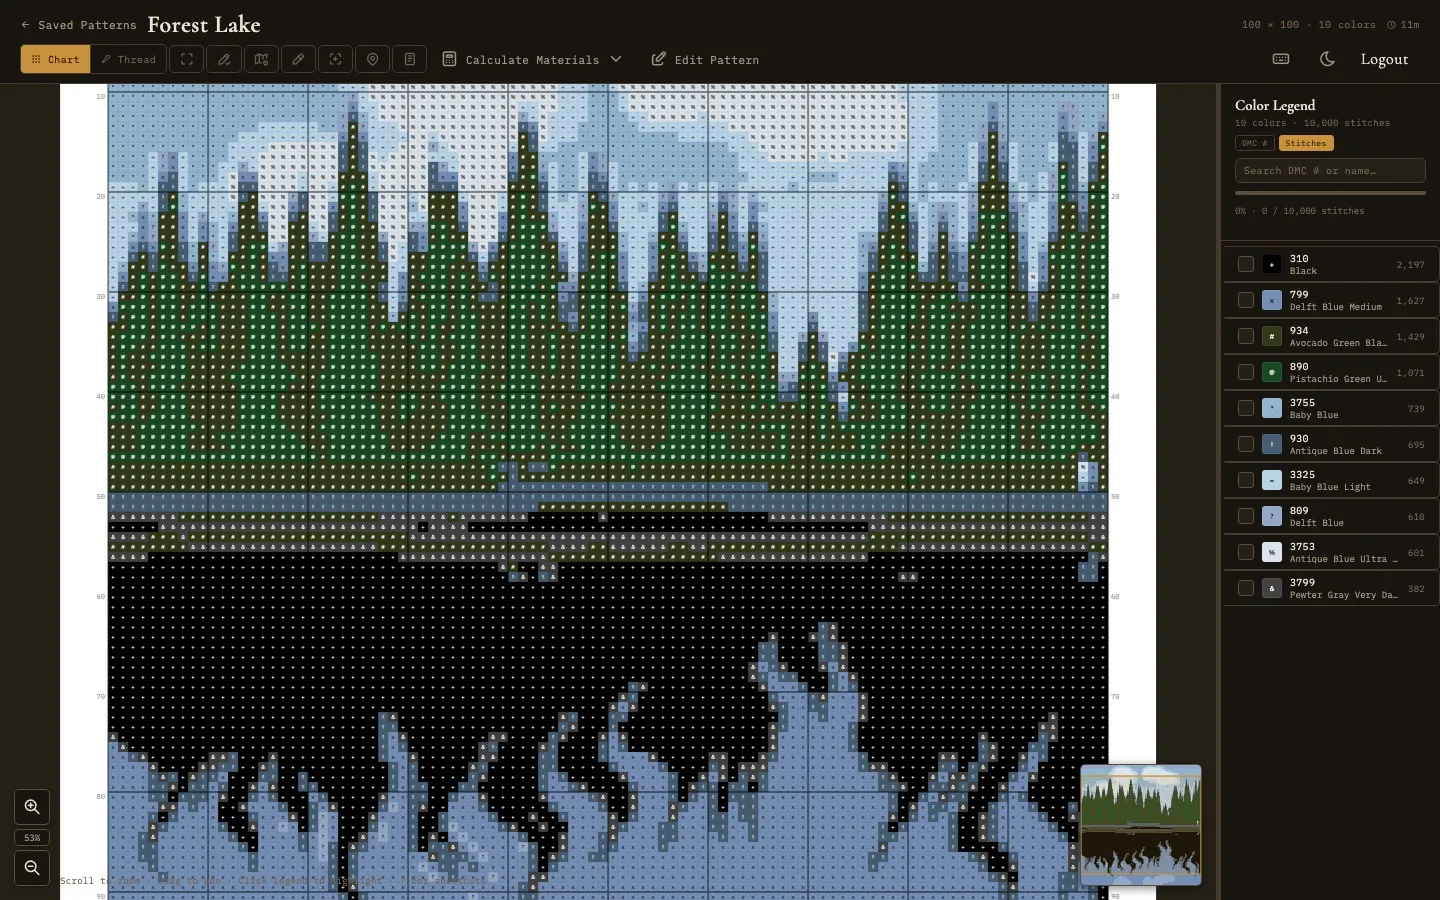
The pattern viewer in chart mode with color legend and progress tracking
Viewing Modes
The Pattern Viewer has three viewing modes. Switch between them using the mode toggle buttons in the viewer toolbar.
Chart Mode
Chart mode displays the pattern as a traditional cross-stitch chart - a grid of colored squares with symbol overlays. This is the standard way to read a cross-stitch pattern while stitching. Each grid cell shows a colored square with a unique symbol assigned to that thread color. The symbol overlays ensure that the chart remains readable even when printed in black and white or when two similar colors are used side by side.
Chart mode includes four-sided rulers along the top, bottom, left, and right edges of the grid. These rulers display stitch coordinates and make it easy to count your position on the fabric. The rulers follow your scroll position so they remain visible as you pan across the pattern.
Gridlines are always displayed in chart mode, providing thin lines between each stitch cell to help with counting stitches and following rows. Symbols are shown automatically when cells are at least 8 pixels in size, ensuring the chart remains readable at all zoom levels.
Backstitches in chart mode render with a different dash pattern per color (solid, dashed, dotted, dash-dot, and so on) so colors stay distinguishable in printed or low-contrast charts. If you would rather see every backstitch as a clean solid line, turn on Solid backstitches in chart mode in Settings → Display.
Thread Mode
Thread mode renders the pattern with realistic stitch textures instead of flat colored squares. Each stitch is drawn to approximate the appearance of actual thread on fabric, showing the characteristic X shape of cross-stitches with simulated thread texture and shading. This mode gives you a preview of how the finished piece will look when stitched.
Thread mode is particularly useful for evaluating color choices, checking that gradients look natural, and getting a sense of the overall visual impact of the design before committing to stitching it.
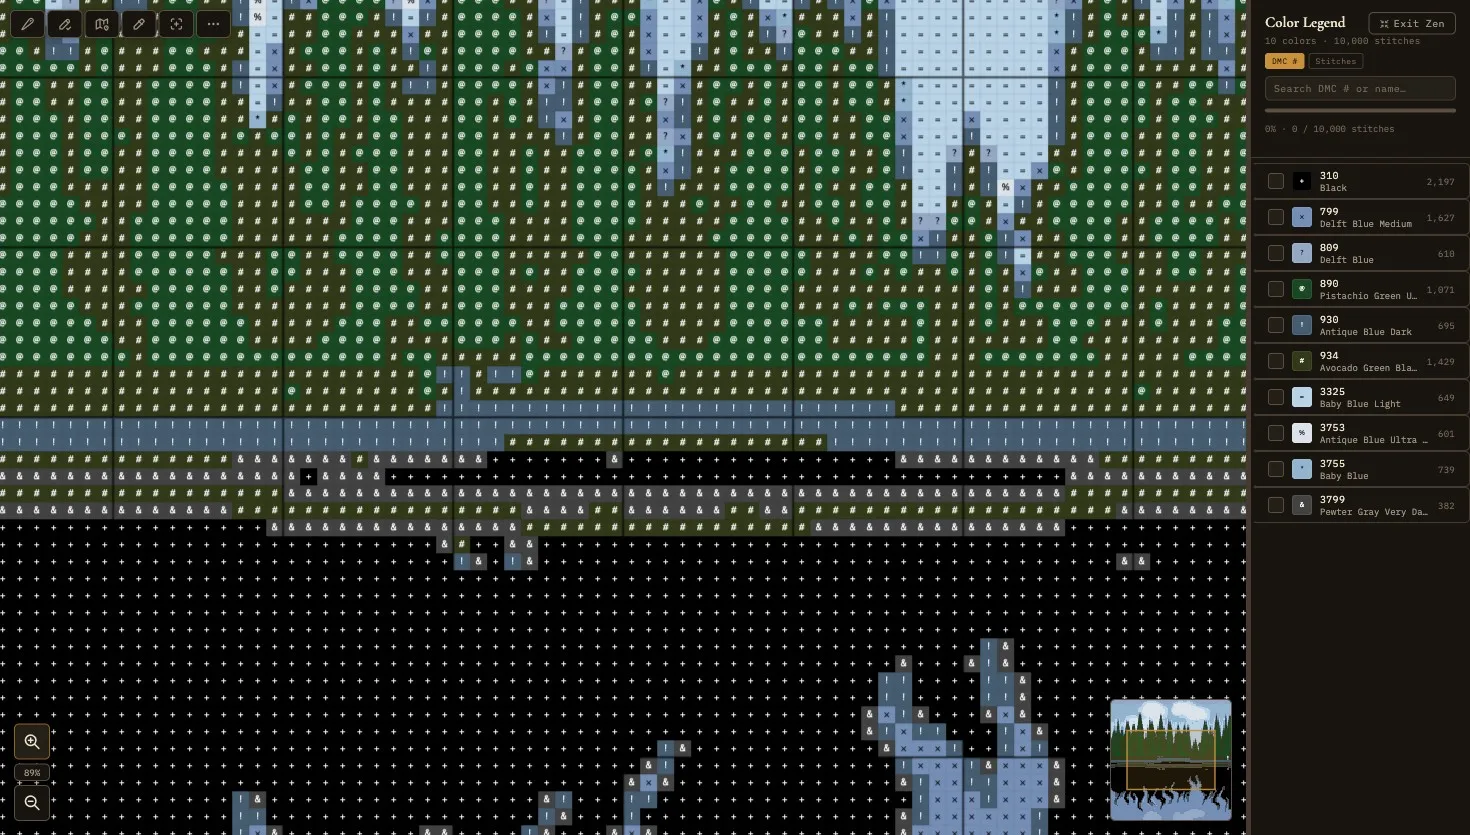
Zen Mode
Zen mode provides a distraction-free, fullscreen viewing experience. When activated, the navigation bar, sidebar, toolbar, and all other interface elements are hidden, leaving only the pattern chart filling the entire screen. This mode is designed for focused stitching sessions where you want maximum screen space for the chart.
Press F or click the zen mode button to enter zen mode. Press F or Escape to exit back to the normal view.
Legend Panel
The legend panel is a sidebar that displays a list of all thread colors used in the current pattern. It serves as both a reference and a progress tracking tool.
Thread List
Each entry in the legend shows the thread's color swatch, symbol (as used in chart mode), thread number, name, and stitch count. The legend provides a complete bill of materials for the pattern, telling you exactly which threads you need and how many stitches of each color the pattern contains.
Pattern Summary
At the top of the legend, a summary line shows the total number of colors, the weighted stitch count across all stitch types, and an approximate skein estimate for 14-count fabric. Different stitch types are weighted according to their thread usage (a half stitch counts as 0.5, a quarter stitch as 0.25, and so on) so the totals reflect actual material consumption rather than just the raw cell count.
Sort Options
The legend provides DMC # and Stitches sort buttons to reorder the thread list. Sort by DMC number for a consistent reference order, or sort by stitch count to see which colors dominate the pattern.
Search
The legend panel includes a search field that lets you filter the thread list by thread number or name. This is useful in patterns with many colors when you need to quickly find a specific thread.
Resizable Sidebar
The legend panel is resizable - drag its edge to make it wider or narrower according to your preference. This allows you to balance the space between the legend and the chart area. The panel can also be collapsed entirely to maximize the chart viewing area.
Per-Color Progress Tracking
Each color entry in the legend includes a progress toggle. You can mark individual colors as complete when you have finished stitching all instances of that color in the pattern. Completed colors are visually distinguished in the legend (dimmed or struck through), making it easy to see at a glance which colors remain. This per-color tracking is especially useful when stitching with the "cross-country" method, where you complete one color at a time across the entire pattern.
Minimap
A minimap in the bottom-right corner of the viewer shows a scaled-down overview of the entire pattern. A highlighted rectangle indicates the portion of the pattern currently visible in the main viewport. Click or drag on the minimap to jump to a different area. The minimap is especially helpful on large patterns where the zoomed-in view only shows a small section of the chart.
Zoom Controls
The viewer supports a wide zoom range, giving you the flexibility to see the entire pattern at once or zoom in to inspect individual stitches.
- Zoom in - Click the + button in the toolbar, or scroll up with your mouse scroll wheel.
- Zoom out - Click the - button in the toolbar, or scroll down with your mouse scroll wheel.
The current zoom level is displayed as a percentage in the toolbar. At lower zoom levels, symbols are hidden automatically (they appear when cells are at least 8 pixels in size), showing only the color blocks.
Toolbar
The viewer toolbar provides access to key features and tools for working with your pattern.
Edit Pattern
Click the Edit Pattern button to open the full pattern editor inline within the viewer. This lets you make design changes without leaving the viewer context, then return to viewing and tracking progress.
Calculate Materials
The Calculate Materials dropdown in the toolbar opens the calculator already pre-filled with the current pattern. The Thread Needs entry hands the calculator the pattern's stitch count and per-color breakdown so you can estimate skeins immediately, and the Fabric Size entry hands it the grid dimensions so you can size fabric without retyping anything. Both options carry over the saved per-pattern calculator defaults if you set any (see Materials Calculator).
Stitch Layer Toggles
The viewer toolbar includes three layer toggles for backstitches, French knots, and beads. Click any of them to hide or show that layer on the chart - useful when you want to plan the full-cross pass without visual noise from outlines or accent stitches, then re-enable them once you reach those passes. The same three toggles also appear in the zen mode toolbar so you can flip layers without leaving fullscreen, and your preferences are remembered between sessions. Layers that the loaded pattern doesn't actually use stay hidden either way.
Keyboard Shortcuts
The Pattern Viewer supports the following keyboard shortcuts for efficient navigation and control:
- F - Toggle zen mode
- M - Toggle mark complete mode
- B - Place marker
- N - Open notes
- G - Open goto panel
- X - Toggle crosshair guides
- K - Pick color from chart
- Ctrl+Z / Cmd+Z - Undo progress
- Ctrl+Y / Ctrl+Shift+Z - Redo progress
- Escape - Exit zen mode
- ? - Show keyboard shortcuts
Progress Tracking
Progress tracking in the Pattern Viewer works at the cell level. Press M or click the Mark Complete button to enter stitch marking mode. In this mode, click or drag across cells on the chart to mark them as stitched. Marked cells are visually distinguished on the chart so you can see exactly which areas are complete.
A progress bar is displayed showing the percentage and stitch count of your progress, for example: 45% · 6,480 / 14,400 stitches. Cell-level progress feeds into per-color completion shown in the legend panel, so each color entry reflects how much of that color has been stitched.
Progress Undo and Redo
The viewer maintains a full undo/redo history for progress changes. If you accidentally mark cells or undo a marking, press Ctrl+Z (or Cmd+Z on macOS) to undo the last progress change, and Ctrl+Y (or Ctrl+Shift+Z) to redo.
Session Timer
A session timer appears in the viewer header showing the cumulative time you have spent working on the pattern. The timer automatically pauses when the browser tab is hidden or loses focus, and resumes when you return to the tab. This ensures the recorded time accurately reflects active stitching sessions.
Estimated Remaining Time
The viewer calculates an estimated time remaining based on your cell-level stitched percentage combined with the session timer. The estimate requires at least 1% cell-level progress and nonzero elapsed time before it appears. As you mark more cells complete, the estimate becomes more accurate. It is displayed above the legend and updates in real time as you work.
Place Markers
Press B to enter place marker mode. In this mode, clicking on a grid cell places a colored pin marker at that location. Markers are useful for tracking your current stitching position, flagging areas that need attention, or annotating specific cells. Markers are saved with the pattern and synchronized across devices when using Desktop Sync. They do not affect the stitch data.
Notes Panel
Press N to toggle the notes panel. The notes panel lets you write and edit free-text notes for the current pattern. Notes are visible in the pattern viewer and also displayed on pattern cards in the Saved Patterns gallery. Use notes to record stitching reminders, fabric details, gift recipients, or any other information you want to associate with the pattern.
Goto Panel
Press G to open the goto panel, which lets you jump directly to a specific row and column on the grid. Enter the coordinates and press Enter to center the viewport on that location. This is especially helpful on large patterns where scrolling to a specific position would be slow.
Crosshair Guides
Press X to toggle crosshair guides. When enabled, horizontal and vertical guide lines follow your cursor across the chart, making it easier to track your position on large patterns. Crosshair guides are available in all viewing modes including zen mode.
Pick Color
Press K to activate the Pick Color tool. Click any cell on the chart to select that thread color in the legend panel. This is a quick way to identify which thread is used in a specific area of the pattern without scrolling through the legend manually.
Progress data is saved as part of the pattern, so it persists across sessions. If you are using Desktop Sync, your progress is also synchronized between the desktop app and your server instance, allowing you to track progress from any device.
For broader project management features including pattern status tracking and materials calculation, see Project Management.